Low-resolution images can be a real headache. Blurry prints, rejected uploads, pixelated screens – the frustration is real. But what if you could breathe new life into those images, making them crisp and clear with the power of AI?
Good news! It’s entirely possible. In fact, you can increase image resolution using AI in just a couple of minutes with the right tools.
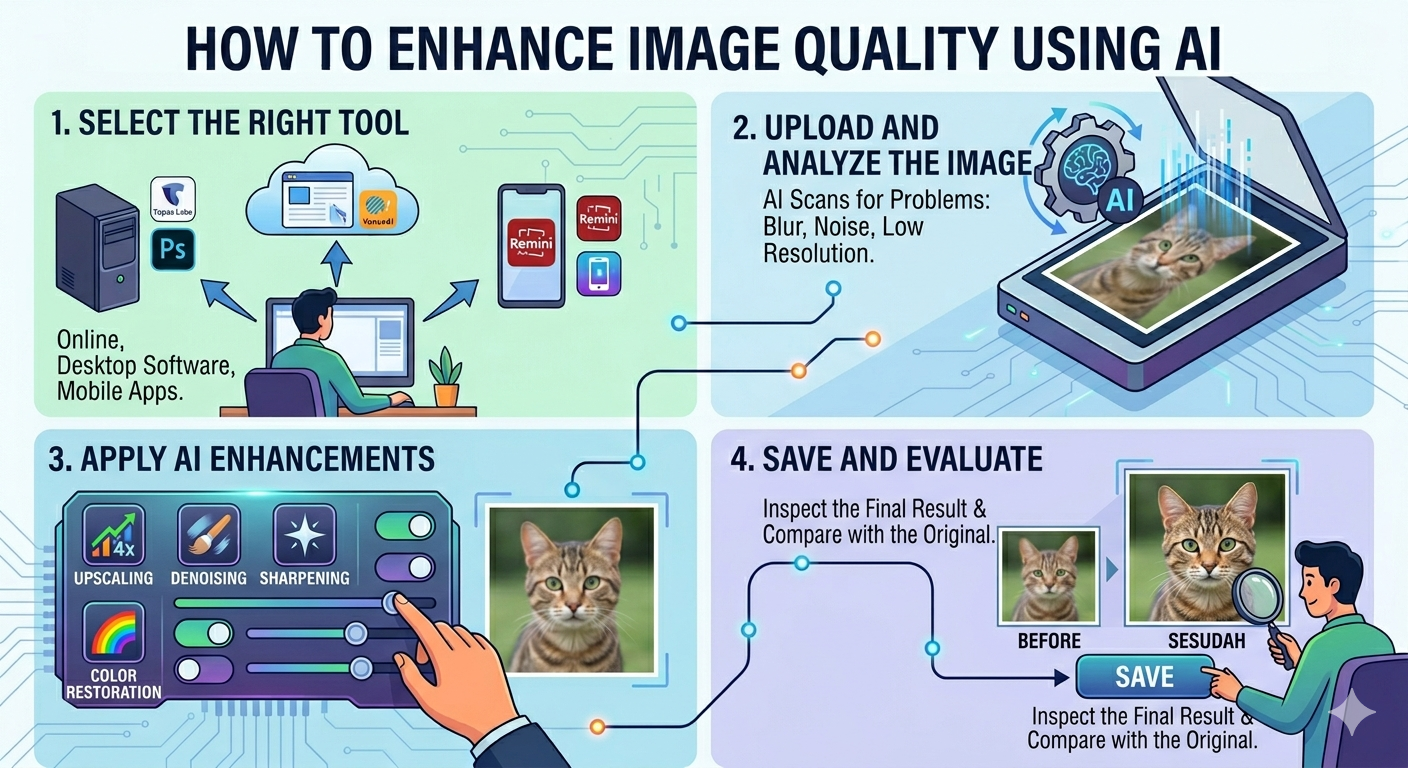
Several AI-powered tools can upscale your images quickly and easily. Top contenders include Let’s Enhance, Topaz Gigapixel AI, Upscayl, and Adobe Photoshop’s Super Resolution feature. Even mobile apps like Remini can help.
This guide will walk you through each method, step-by-step, so you can choose the best approach for your needs.
| Understanding Image Resolution |
Let’s break down what image resolution actually means:
- Pixels: Think of pixels as tiny squares that make up your image. More pixels generally mean a sharper, more detailed image.
- DPI (Dots Per Inch): This refers to the number of ink dots per inch in a printed image. Higher DPI means a sharper print. 300 DPI is generally considered the standard for high-quality prints.
- PPI (Pixels Per Inch): Similar to DPI, but refers to the pixel density on a screen. PPI affects how sharp an image looks on your monitor, phone, or tablet.
Why does resolution matter?
The required resolution depends heavily on the intended use of the image:
- Web: Web images can often be lower resolution to ensure fast loading times.
- Print: Printed images need a much higher resolution to avoid appearing blurry or pixelated.
- Social Media: Each social media platform has its own recommended image dimensions and resolutions.
Here are some general minimum resolution guidelines:
- Web Images: Aim for at least 72 PPI.
- Social Media: Follow platform-specific guidelines (more on this later).
- Print (Small Photos): 300 DPI for crisp details.
- Print (Large Posters): 150-200 DPI may be acceptable, depending on viewing distance.
| Method 1: Using Let’s Enhance (Online, Beginner) |
Let’s Enhance is a user-friendly online tool that uses AI to upscale images. It’s perfect for beginners who want a quick and easy solution.
Don’t worry, this is easier than it sounds! Just follow these simple steps:
- Upload Your Image: Go to the Let’s Enhance website and drag and drop your image into the designated area.
- Choose Your Upscale Factor: Select how much you want to increase the resolution (e.g., 2x, 4x).
- Select a ‘Mode’: Let’s Enhance offers different modes designed for specific content types (photo, digital art, etc.).
- Start Processing: Click the ‘Start Processing’ button and let the AI do its magic.
- Download: Preview the result and download your enhanced image.
Pro Tip: Experiment with different modes to see which one yields the best results for your image. The ‘Photo’ mode is a good starting point for most general photos.
| Method 2: Using Topaz Gigapixel AI (Desktop, Advanced) |
Topaz Gigapixel AI is a powerful desktop application renowned for its advanced AI upscaling capabilities. It delivers exceptional results but comes with a higher price tag and a steeper learning curve.
Don’t be intimidated! These steps will guide you through the process:
- Download and Install: Download and install Topaz Gigapixel AI on your computer.
- Open Your Image: Open the application and drag and drop your image into the workspace.
- Adjust Settings: Experiment with the various settings, such as ‘Suppress Noise’ and ‘Remove Blur,’ to fine-tune the upscaling process.
- Choose Output Settings: Select your desired output format, resolution, and file name.
- Start Processing: Click the ‘Start Processing’ button and let Gigapixel AI work its magic.
- Export: Review and export the updated image.
Pro Tip: Gigapixel AI is excellent for batch processing. You can load multiple images and apply the same settings to all of them, saving you a significant amount of time.
| Method 3: Using Upscayl (Free, Open-Source) |
Upscayl is a fantastic free and open-source AI image upscaler. It’s a great option if you’re looking for a powerful solution without the cost.
The steps are quite straightforward, so don’t worry:
- Download and Install: Download and install Upscayl from the official website.
- Open Your Image: Open Upscayl and drag and drop your image into the application.
- Select Upscale Type: Select which upscale type you’d like to use.
- Start Upscaling: Click the ‘Upscayl’ button to begin the process.
- Locate New Image: The new image will automatically be saved to your computer.
Pro Tip: To maximize Upscayl’s performance, especially with larger images, ensure you have GPU acceleration enabled in the settings. This will utilize your graphics card for faster processing.
| Method 4: Using Adobe Photoshop AI Super Resolution |
If you’re already an Adobe Photoshop user, you can leverage its built-in AI Super Resolution feature to increase image resolution.
Here’s how:
- Open Your Image: Open your image in Adobe Photoshop.
- Navigate to Image Size: Right click the image layer in the Layers panel and select ‘Enhance’
- Super Resolution: Photoshop will upscale the image using AI. It will automatically create a new enhanced file.
- Save: Save the new, higher-resolution image.
Pro Tip: The Super Resolution feature doubles the linear resolution of your image (e.g., from 1000×1000 pixels to 2000×2000 pixels). You can run it multiple times, but be mindful of potential quality degradation.
| Method 5: Mobile Resolution Increase |
Need to boost image resolution on the go? Mobile apps like Remini can help. These apps use AI to enhance and upscale photos directly on your smartphone or tablet.
The process is remarkably simple:
- Download and Install: Download and install Remini (or a similar app) from your app store.
- Upload Your Image: Open the app and upload the image you want to enhance.
- Enhance: Tap the ‘Enhance’ button and let the AI work its magic. Most apps will require you to watch an advert before processing.
- Save: Preview the result and save the enhanced image to your device.
Pro Tip: Mobile AI upscaling apps are great for quick fixes and improving the quality of older photos. However, they may not offer the same level of control and quality as desktop solutions.
| Comparison Table |
| Method | Tool | Free | Max Upscale | Speed | Best For |
| Online AI Upscaling | Let’s Enhance | Limited Free Plan | 4x | Fast | Beginners, Quick Enhancements |
| Desktop AI Upscaling | Topaz Gigapixel AI | Paid | 6x+ | Moderate to Slow | Professionals, High-Quality Results |
| Free and Open-Source | Upscayl | Yes | 4x | Moderate | Users on a Budget, Experimentation |
| Adobe Integration | Photoshop Super Resolution | Included with Subscription | 2x (Linear) | Fast | Photoshop Users, Seamless Workflow |
| Mobile Upscaling | Remini | Limited Free Plan | Varies | Fast | On-the-Go Enhancements |
| Resolution Guide for Common Use Cases |
Here’s a quick reference guide to help you determine the appropriate resolution for different scenarios:
- Web Images: 72 PPI is generally sufficient. Optimize image size for faster loading times.
- Social Media:
- Facebook: Recommended resolution is 2048 pixels on the longest edge.
- Instagram: Recommended resolution is 1080 pixels wide.
- Twitter: Recommended resolution is 1200 x 675 pixels.
- Print:
- 4×6 Photos: 300 DPI (1200 x 1800 pixels).
- 8×10 Photos: 300 DPI (2400 x 3000 pixels).
- Posters: 150-200 DPI (adjust pixel dimensions based on poster size).
- Video Thumbnails: 1280 x 720 pixels (720p).
| Common Mistakes to Avoid |
Here are some common pitfalls to watch out for when increasing image resolution:
- Starting with Too Small an Image: AI can work wonders, but it can’t create detail that isn’t there. Starting with a very low-resolution image will likely result in a subpar outcome.
- Over-Upscaling (Artifacts Appear): Increasing the resolution too much can introduce unwanted artifacts and make the image look unnatural. Experiment to find the sweet spot.
- Wrong Output Format for Intended Use: Save your images in the appropriate format (e.g., JPEG for web, TIFF for print) to ensure optimal quality and compatibility.
| FAQ Section |
Q: What’s the easiest way to increase image resolution?
A: Let’s Enhance is a great option for beginners due to its user-friendly interface and quick results.
Q: How much can I increase resolution without quality loss?
A: It depends on the original image and the AI upscaling tool. A 2x or 4x increase is generally safe, but experiment to see what works best.
Q: What resolution do I need for printing?
A: 300 DPI is the standard for high-quality prints. Adjust pixel dimensions based on the desired print size.
Q: Can I increase resolution on my phone?
A: Yes! Apps like Remini allow you to enhance and upscale photos directly on your mobile device.
Q: Is free AI upscaling good enough?
A: Free AI upscaling tools can provide decent results for basic enhancements. However, paid options often offer superior quality and more advanced features.
| Conclusion |
Increasing image resolution with AI is now easier than ever. For quick web use, Let’s Enhance offers a speedy online solution. For print professionals and photographers needing the highest quality, Topaz Gigapixel AI delivers unparalleled results. Upscayl provides a solid free option, while Photoshop’s Super Resolution integrates seamlessly into existing workflows. No matter your skill level or budget, there’s an AI upscaling tool to meet your needs.